Xata
Connecting to Xata Database from a DevZero workspace.
Comprehensive guide for connecting to Xata Workspace Database from your DevBox.
If you're more of a visual learner, check out the video tutorial!
Architecture Diagram

Xata is a serverless data platform for PostgreSQL that optimizes reliability, scalability, and developer experience. Xata provides features that make it easier to build modern applications, such as Branching, Zero-downtime schema migrations, File attachments, and more. In this guide, we will walk you through the entire process of connecting your Xata Database to your DevBox step by step.
Prerequisites
Before you begin, create your account with Xata and create a new Workspace.
Existing Xata Database - PostgreSQL
Step 1: Creating the API Key
First, you need to get the API access key so that we can connect to the Database:
- Go to Xata Account Settings.
- In the Personal API keys section, click on Add a key and enter the name of the key.
- Note down the secret API key.
Step 2: Creating the Recipe for Workspace
You will need to create a Recipe in DevZero equipped with the necessary tools like psql and store your API keys as well:
- Go to DevZero Dashboard and open the Recipes tab.
- Click on New Recipe and enter the recipe's name.
- Click on Create a recipe, and your recipe will be created.
- Replace the recipe
yamlfile with the snippet below. Remember to replace the placeholder API key with the key you noted down in the above steps:
version: "3"

build:
  steps:
    - type: apt-get
      packages:
        [
          "build-essential",
          "curl",
          "git",
          "nano",
          "software-properties-common",
          "ssh",
          "sudo",
          "tar",
          "unzip",
          "vim",
          "wget",
          "zip",
          "postgresql-client",
        ]

runtime:
  environment:
    - name: XATA_API_KEY
      value: <api-key>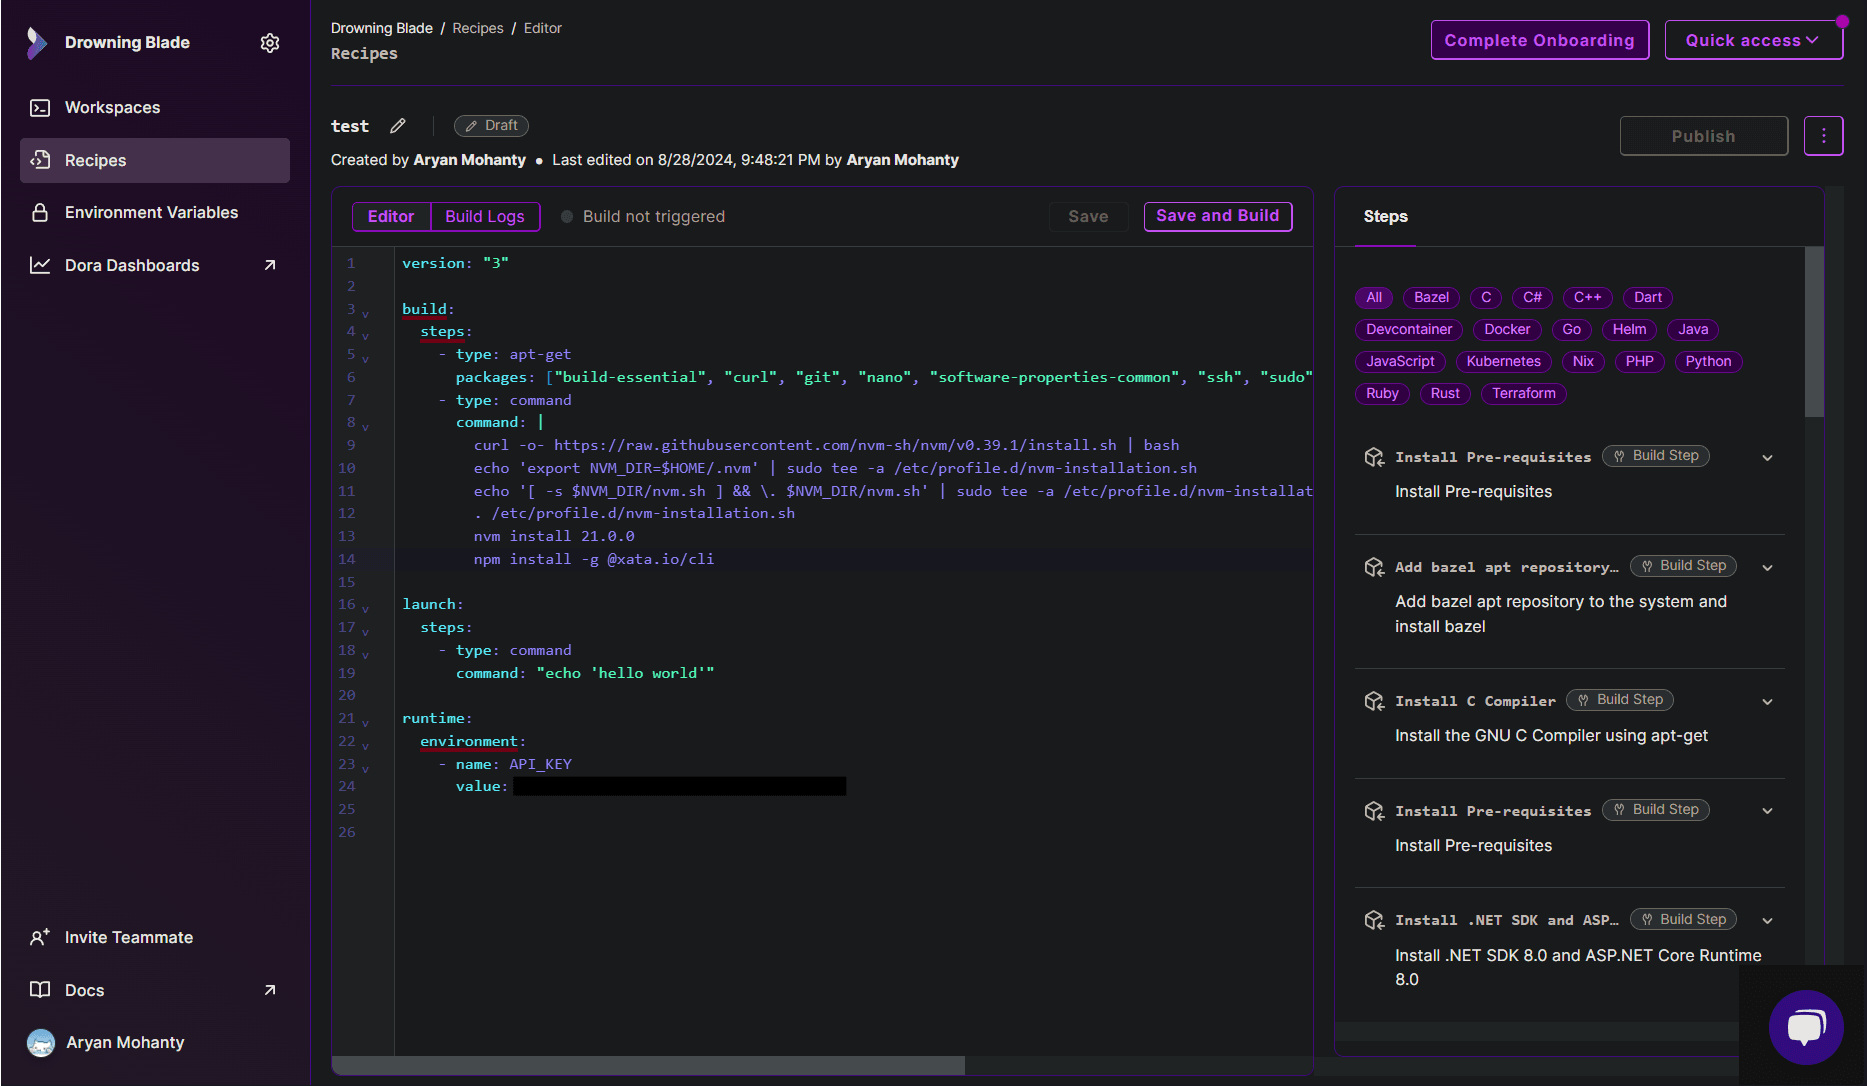
- After editing the recipe, click on Save and Build.
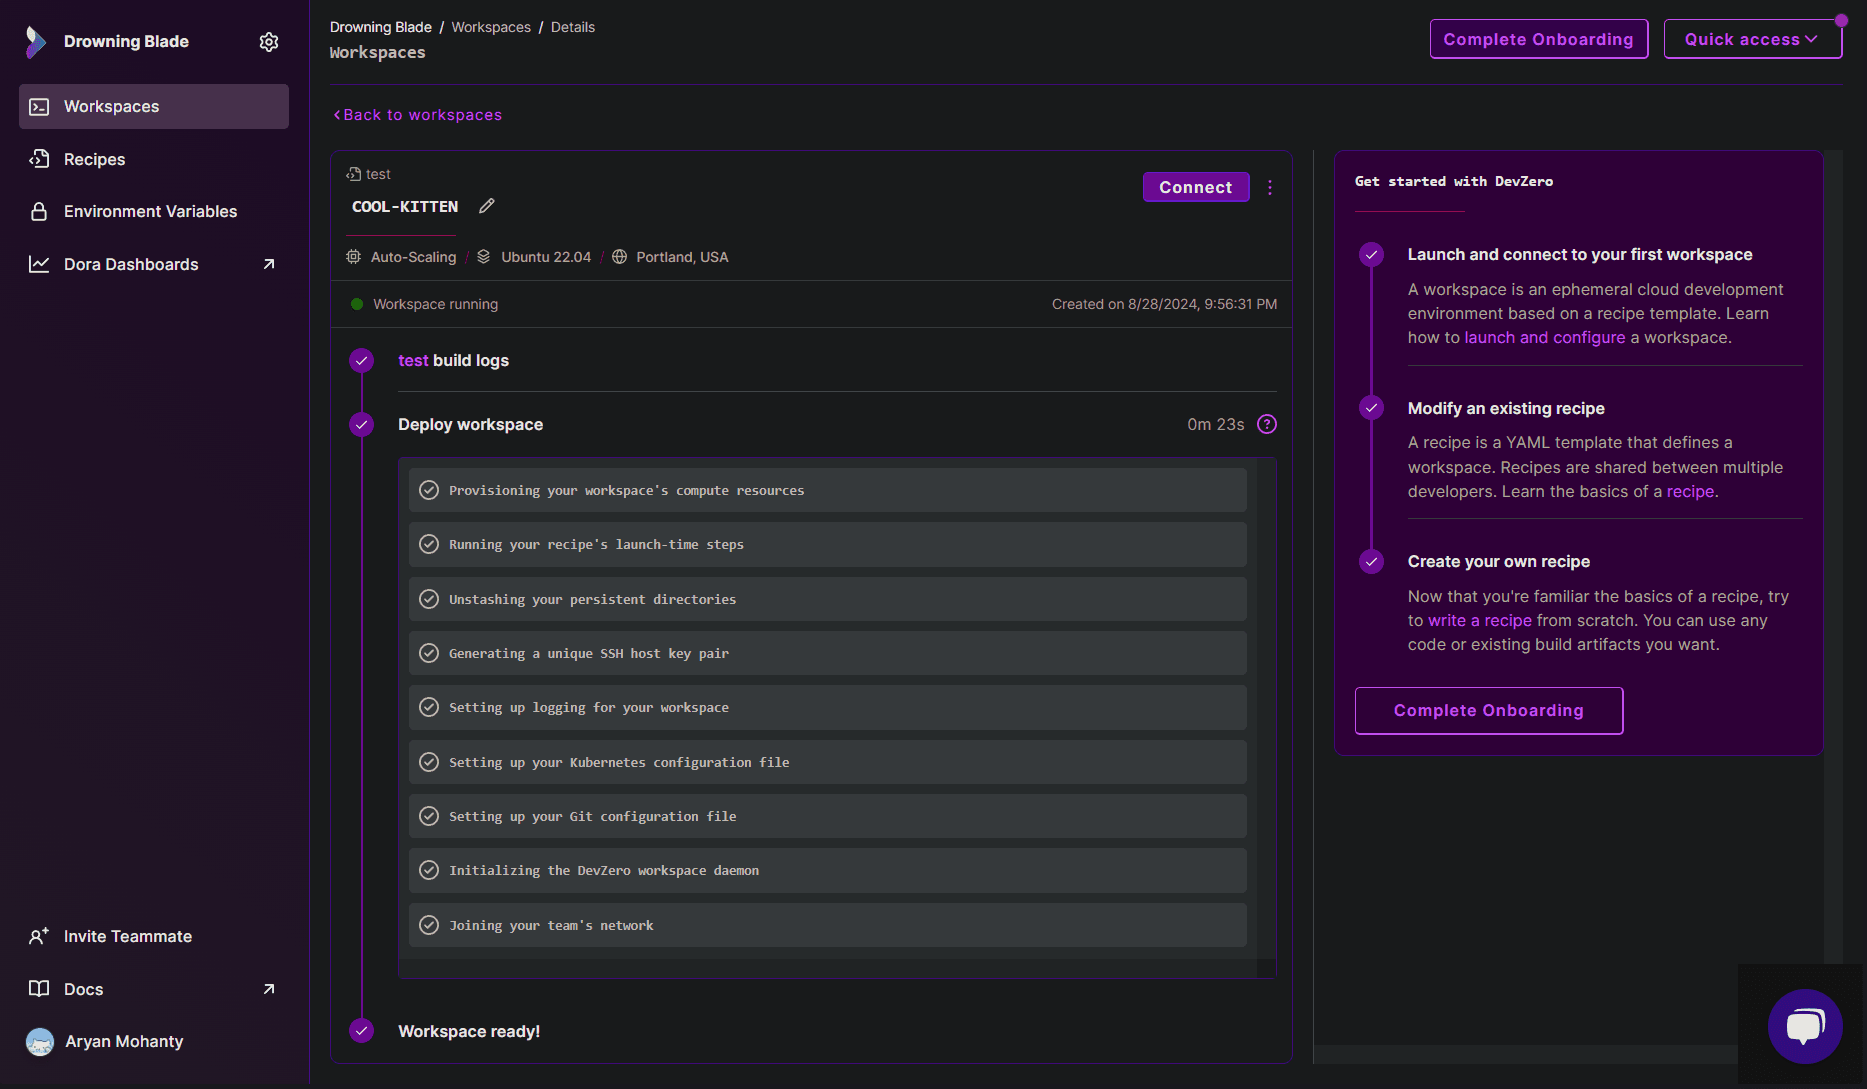
- When the build is successful, click on Launch.
- With the recipe already selected, click on Launch and your workspace will be created.
Step 3: Connecting to the Database
Follow the below steps to connect to the database instance:
- Go to Xata Dashboard.
- Open the Database that you want to access through DevBox.

- Copy the connection string for PostgreSQL endpoint and then use the following command to connect to the Database:
psql postgresql://<workspace-id>:$XATA_API_KEY@<region>.sql.xata.sh/<database-name>:<branch>?sslmode=require
New Xata Database - PostgreSQL
If you need to make a new Xata database and access it through DevBox, then follow the below steps:
Step 1: Creating a Workspace Database
- Go to Xata Dashboard.
- If you haven't created a database, the dashboard will automatically prompt you to create one, but if you have completed the initial setup, you need to click on Add Database.
- Enter the database Name, choose the Region and enable the Enable direct access to Postgres option.
- Click on Create, and your Database will be created and shown on your dashboard.

Step 2: Creating the API Key
First, you need to get the API access key so that we can connect to the Database:
- Go to Xata Account Settings.
- In the Personal API keys section, click on Add a key and enter the name of the key.
- Note down the secret API key.
Step 3: Creating the Recipe for Workspace
You will need to create a Recipe in DevZero equipped with the necessary tools like psql and store your API keys as well:
- Go to DevZero Dashboard and open the Recipes tab.
- Click on New Recipe and enter the recipe's name.
- Click on Create a recipe, and your recipe will be created.
- Replace the recipe
yamlfile with the snippet below. Remember to replace the placeholder API key with the Key you noted down in the above steps:
version: "3"

build:
  steps:
    - type: apt-get
      packages:
        [
          "build-essential",
          "curl",
          "git",
          "nano",
          "software-properties-common",
          "ssh",
          "sudo",
          "tar",
          "unzip",
          "vim",
          "wget",
          "zip",
          "postgresql-client",
        ]

runtime:
  environment:
    - name: XATA_API_KEY
      value: <api-key>
- After editing the recipe, click on Save and Build.
- When the build is successful, click on Launch.
- With the recipe already selected, click on Launch and your workspace will be created.
Step 4: Connecting to the Database
Follow the below steps to connect to the database instance:
- Go to Xata Dashboard.
- Open the database which you want to access through the DevBox.
- Copy the connection string for PostgreSQL endpoint and then use the following command to connect to the database:
psql postgresql://<workspace-id>:$XATA_API_KEY@<region>.sql.xata.sh/<database-name>:<branch>?sslmode=require
Existing Xata Database - Xata
Step 1: Creating the API Key
First you need to get the API access key so that we can connect to the database:
- Go to Xata Account Settings.
- In the Personal API keys section, click on Add a key and enter the name of the key.
- Note down the secret API key.
Step 2: Creating the Recipe for Workspace
You will need to create a Recipe in DevZero equiped with the neccesary tools like node, xata and store your API keys as well:
- Go to DevZero Dashboard and open the Recipes tab.
- Click on New Recipe and enter the name of recipe.
- Click on Create a recipe and your recipe will be created.
- Replace the recipe
yamlfile with the snippet below. Remember to replace the placeholder API key with the Key you noted down in the above steps:
version: "3"

build:
  steps:
    - type: apt-get
      packages:
        [
          "build-essential",
          "curl",
          "git",
          "nano",
          "software-properties-common",
          "ssh",
          "sudo",
          "tar",
          "unzip",
          "vim",
          "wget",
          "zip",
        ]
    - type: command
      command: |
        curl -o- https://raw.githubusercontent.com/nvm-sh/nvm/v0.39.1/install.sh | bash
        echo 'export NVM_DIR=$HOME/.nvm' | sudo tee -a /etc/profile.d/nvm-installation.sh
        echo '[ -s $NVM_DIR/nvm.sh ] && \. $NVM_DIR/nvm.sh' | sudo tee -a /etc/profile.d/nvm-installation.sh
        . /etc/profile.d/nvm-installation.sh
        nvm install 21.0.0
        npm install -g @xata.io/cli

runtime:
  environment:
    - name: XATA_API_KEY
      value: <api-key>
- After editing the recipe, click on Save and Build.
- When the build is successful, click on Launch.
- With the recipe already selected, click on Launch and your workspace will be created.
Step 3: Connecting to the Database
Follow the below steps to connect to the database instance:
- Go to DevBox and use the following command to authenticate your xata account:
xata auth login- Choose the
Use an existing API keyoption while authenticating, and then hit Enter/Return with the API Key shown when prompted. - Use the following command for access the database through Xata shell:
xata shell- Select the Workspace, Database and Branch when prompted.

New Xata Database - Xata
If you need to make a new Xata database and access it through DevBox, then follow the below steps:
Step 1: Creating a Workspace Database
- Go to Xata Dashboard.
- If you haven't created a database, the dashboard will automatically prompt you to create one, but if you have completed the initial setup, you just need to click on Add database.
- Enter the database Name, and choose the Region.
- Click on Create and your Database will be created and will show up on your dashboard.
Step 2: Creating the API Key
First, you need to get the API access key so that we can connect to the database:
- Go to Xata Account Settings.
- In the Personal API keys section, click on Add a key and enter the name of the key.
- Note down the secret API key.
Step 3: Creating the Recipe for Workspace
You will need to create a Recipe in DevZero equipped with the necessary tools like node and xata and store your API keys as well:
- Go to DevZero Dashboard and open the Recipes tab.
- Click on New Recipe and enter the recipe's name.
- Click on Create a recipe, and your recipe will be created.
- Replace the recipe
yamlfile with the snippet below. Remember to replace the placeholder API key with the Key you noted down in the above steps:
version: "3"

build:
  steps:
    - type: apt-get
      packages:
        [
          "build-essential",
          "curl",
          "git",
          "nano",
          "software-properties-common",
          "ssh",
          "sudo",
          "tar",
          "unzip",
          "vim",
          "wget",
          "zip",
        ]
    - type: command
      command: |
        curl -o- https://raw.githubusercontent.com/nvm-sh/nvm/v0.39.1/install.sh | bash
        echo 'export NVM_DIR=$HOME/.nvm' | sudo tee -a /etc/profile.d/nvm-installation.sh
        echo '[ -s $NVM_DIR/nvm.sh ] && \. $NVM_DIR/nvm.sh' | sudo tee -a /etc/profile.d/nvm-installation.sh
        . /etc/profile.d/nvm-installation.sh
        nvm install 21.0.0
        npm install -g @xata.io/cli

runtime:
  environment:
    - name: XATA_API_KEY
      value: <api-key>
- After editing the recipe, click on Save and Build.
- When the build is successful, click on Launch.
- With the recipe already selected, click on Launch and your workspace will be created.
Step 4: Connecting to the Database
Follow the below steps to connect to the database instance:
- Go to DevBox and use the following command to authenticate your Xata account:
xata auth login- Choose the
Use an existing API keyoption while authenticating and then hit Enter/Return without entering the API Key when prompted. - Use the following command to access Databasebase through the Xata shell:
xata shell- Select the Workspace, Database and Branch when prompted.